Introduction
As you may already know the process to debug NuGet packages was not easy ( https://docs.microsoft.com/en-us/nuget/create-packages/symbol-packages ). We needed to generate symbol packages (mypackage.symbols.nupkg) then publish them through a symbols server. The hosting of NuGet packages is really easy since a simple file share is enough to do this or create a MVC website is done in 5 minutes only. But the problem comes as soon as we want to debug due to there is no (to my knowledge) free and easy solution to host them (especially to support both of .Net framework AND .Net Core/Standard).
A new solution that Microsoft suggests is to use the new debug format (mypackage.snupkg) that contains symbols but we still have 2 packages. Moreover, .snupkg have some limitations to consider like:
- Windows PDB (C++) are not supported
- Azure DevOps Artifacts doesn’t support .snupkg
- …
After some searches I heard about SourceLink that allows to debug the package directly. The idea is the package definition knows which commit of which file of which git repository we are running. Consequently Visual Studio should be able to download the matching file from the repository.
SourceLink
Producer
1/3 Add the prerequisite package
By adding some configuration in your Nuget package definitions and .csproj you can make your debuggable packages effortless.
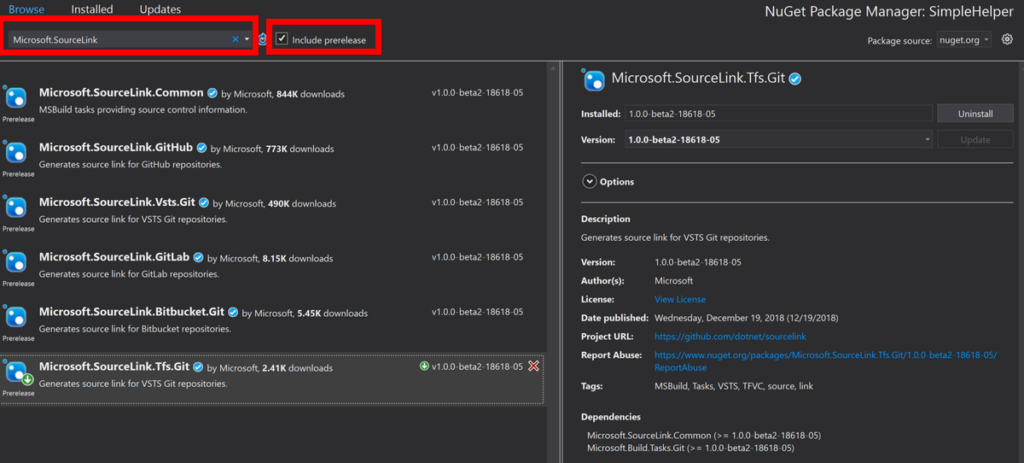
First of all you will need to add “Microsoft.SourceLink.***” to our project. Currently these packages are only in preview so be careful to check the “Include prerelease” checkbox.

As you can see a lot of Git providers are supported:
- GitHub
- Vsts.Git
- GitLab
- Bitbucket.Git
- Tfs.Git
In my company we have an Azure DevOps Server so I need to take the last one. If your are using Azure DevOps Server (previsously named TFS On-premise) you will need at least the Visual Studio 2019 Update 1 (available in preview) due to an 401 authentication error.
Source Link Error:
git-credential-manager.exe: Could not obtain credentials. Process failed with exit code -1.
ERROR: The request failed with code 401 : "Unauthorized".
But the fix (VS 16.1) works as expected! (https://github.com/dotnet/sourcelink/issues/176).
2/3 Configure the project
This step will depends on our project target. If you are creating a package using .Net Framework and a separate .nuspec you need to add GIT information regarding the source code repository type and the URL.
I choose to directly switch my .Net Framework projects to .Net Core 3. At this time (Tuesday, May 7, 2019) the .Net Core 3 is still in preview but it already supports WPF project (through the “Microsoft.NET.Sdk.WindowsDesktop” SDK) so I have moved our “WPF Components” package to .Net Core 3 too.
Once we have installed the “Microsoft.SourceLink.Tfs.Git” package we need to configure them. So let’s open our SimpleHelper.csproj file. And add the required properties: “AllowedOutputExtensionsInPackageBuildOutputFolder“, “RepositoryUrl“, “SourceLinkTfsGitHost“
<Project Sdk="Microsoft.NET.Sdk">
  <PropertyGroup>
    <AllowedOutputExtensionsInPackageBuildOutputFolder>$(AllowedOutputExtensionsInPackageBuildOutputFolder);.pdb</AllowedOutputExtensionsInPackageBuildOutputFolder>
    <RepositoryUrl>https://mytfs.mycompany.com:8080/tfs/.../_git/NetStandardTest</RepositoryUrl>
  </PropertyGroup>
  <ItemGroup>
    <PackageReference Include="Microsoft.SourceLink.Tfs.Git" Version="1.0.0-beta2-18618-05" PrivateAssets="All" />
    <SourceLinkTfsGitHost Include="myserver.mycompany.com:9999" VirtualDirectory="tfs" />
  </ItemGroup>
</Project>
That’s all! With these information, the build server will be able to push the GIT repository URL and the commit number in the generated .nuspec.
3/3 Configure the build definition
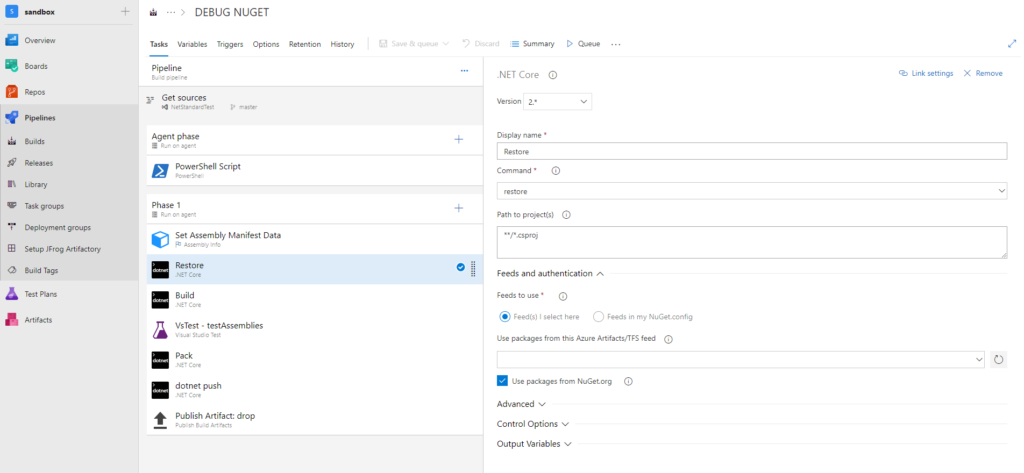
The last step consists of build, produce the package then publish it. After my updates on the csproj and my choice to switch to .Net Core I had to update my build definition. Here an overview of my changes:

First of all please don’t care about my PowerShell script on the “Agent phase” (its role is to increment a variable used by the build number). Then the “Set Assembly Manifest Data” is only here to set the build number as dll versions metadata.
So as you can see the idea was to move all my old NuGet task to the .Net Core tasks.
Restore: I use the default settings to get my dependencies
Build: I use the default settings but I have a global.json (*) file in the root directory to specify explicitly I want to use the .Net Core 3 preview.
Pack: I specify a build variable as version number to use
Push: I just select a local feed of Azure DevOps Server
*Here my global.json file:
{
  "sdk": {
    "version": "3.0.100-preview3-010431"
  }
}
Once this is done, create a project then add our NuGet package. After the build, the package will be downloaded into your user store at ‘C:/Users/ohelin/.nuget/packages‘. Browse it to open the last package version and open the .nupkg file (which is a simple ZIP file). You will find a generated .nuspec file that should contains a property named “repository” with the following information: <repository type=”git” url=”mygitrepo” commit=”9e3195677c….” />. At this time we are sure Visual Studio will have all required data to debug the package.
Consumer
Visual Studio Configuration
When you want to debug these packages you will need to configure Visual Studio to allow the download of the sources from a third party provider.
1. Disable “Just My Code” will allow to step into an external code

2. Enable “Source Link Support” will allow the download of source code

That’s all! Run your program then try to step into a call to our package.

Visual Studio 2019 should ask you to download the source code directly from the GIT repository. Click on “Download Source and Continue Debugging”.

The file was downloaded and I’m debugging into my NuGet package! As you can see, the file was automatically downloaded to a local folder under “C:/user/ohelin/AppData/Local/SourceServer“.
Comments
Hi Olivier, it seems to work very well with Visual Studio 16.1.2. I didn’t see any authentication issue. Thanks!