1. Problématique
2. Solution proposée
2.1 Création de l’application
2.2 Création des lanceurs Window et Web
2.2.1 Lanceur Window
2.2.2 Lanceur Web
Conclusion
1. Problématique
Lorsque vous créer une application WPF, Visual Studio vous propose de choisir entre 2 types de projets : « WPF Application » et « WPF Browser Application »
WPF Application
Prévu pour un déploiement de type « client lourd », Visual crée automatiquement une vue de type « Window » tel que :
xaml:
<Window x:Class="WpfApplication1.MainWindow" xmlns=http://schemas.microsoft.com/winfx/2006/xaml/presentation xmlns:x=http://schemas.microsoft.com/winfx/2006/xaml Title="MainWindow" Height="350" Width="525"> <Grid> </Grid> </Window> |
code behind:
namespace WpfApplication1 { /// <summary> /// Interaction logic for MainWindow.xaml /// </summary> public partial class MainWindow : Window { public MainWindow() { InitializeComponent(); } } } |
WPF Browser Application
Prévu pour un déploiement de type « web », Visual crée automatiquement une vue de type « Page » tel que :
xaml:
<Page x:Class="WpfBrowserApplication1.Page1" xmlns=http://schemas.microsoft.com/winfx/2006/xaml/presentation xmlns:x=http://schemas.microsoft.com/winfx/2006/xaml xmlns:mc="http://schemas.openxmlformats.org/markup-compatibility/2006" xmlns:d="http://schemas.microsoft.com/expression/blend/2008" mc:Ignorable="d" d:DesignHeight="300" d:DesignWidth="300" Title="Page1"> <Grid> </Grid> </Page> |
code behind:
namespace WpfBrowserApplication1 { /// <summary> /// Interaction logic for Page1.xaml /// </summary> public partial class Page1 : Page { public Page1() { InitializeComponent(); } } } |
L’obligation de choisir entre des objets de type Page et Window pose problème si nous voulons avoir un déploiement client (Window) et serveur (Page) à la fois.
2. Solution proposée
Nous allons réaliser une application simple exécutable depuis les deux modes de déploiement précédemment évoqué.
Dans notre cas nous disposons d’une application existante, prévue en client riche. Créons un nouveau projet de type WPF Application « MyNotePad.MyApplication ». Par la suite nous allons créer 2 projets correspondant aux 2 types de déploiement.
2.1 Création de l’application
1. Nous devons supprimer le fichier App.xaml qui fait office de lanceur.
2. Notre vue « MainWindow » étant de type Window, nous devons la faire hériter de UserControl à la place et ceci dans le xaml et dans le code behind.
3. Dans les propriétés du projet, définir l’output type à “Class Library”
Nous obtenons le code suivant :
xaml:
<UserControl x:Class="MyNotePad.MyApplication.MainWindow" xmlns="http://schemas.microsoft.com/winfx/2006/xaml/presentation" xmlns:x="http://schemas.microsoft.com/winfx/2006/xaml" Height="350" Width="525"> <Grid> <Grid.RowDefinitions> <RowDefinition Height="35"/> <RowDefinition Height="*"/> </Grid.RowDefinitions> <Rectangle Grid.Row="0" OpacityMask="{x:Null}"> <Rectangle.Fill> <LinearGradientBrush EndPoint="0.5,1" StartPoint="0.5,0"> <GradientStop Color="#FFDBDBDB" Offset="0" /> <GradientStop Color="White" Offset="1" /> <GradientStop Color="#FFEFEFEF" Offset="0.799" /> </LinearGradientBrush> </Rectangle.Fill> </Rectangle> <Label Content="MultiLauncher Demo" VerticalAlignment="Center" FontWeight="Bold" FontSize="16"> <Label.Foreground> <LinearGradientBrush EndPoint="0.5,1" StartPoint="0.5,0"> <GradientStop Color="Black" Offset="0" /> <GradientStop Color="#FF9A9A9A" Offset="1" /> </LinearGradientBrush> </Label.Foreground> </Label> <RichTextBox HorizontalAlignment="Left" Grid.Row="1" Name="richTextBox1" HorizontalScrollBarVisibility="Auto" VerticalScrollBarVisibility="Auto"> <RichTextBox.Background> <LinearGradientBrush EndPoint="0.5,1" StartPoint="0.5,0"> <GradientStop Color="#FFBABABA" Offset="1" /> <GradientStop Color="White" Offset="0" /> </LinearGradientBrush> </RichTextBox.Background> <FlowDocument> <Paragraph> Lorem ipsum d.... </Paragraph> <Paragraph> Phasellus bibendum, quam fermentum... </Paragraph> <Paragraph> Nam sit amet augue nunc, sit amet pretium... </Paragraph> </FlowDocument> </RichTextBox> </Grid> </UserControl> |
code behind:
namespace MyNotePad.MyApplication { /// <summary> /// Interaction logic for MainWindow.xaml /// </summary> public partial class MainWindow : UserControl { public MainWindow() { InitializeComponent(); } } } |
2.2 Création des lanceurs Window et Web
2.2.1 Lanceur Window
Créons un nouveau projet « MyNotePad.WinLauncher ».
- Dans la vue Design, nous ajoutons un « ContentControl » qui contiendra notre application.
- Dans le code behind nous chargeons l’application
xaml:
<Window x:Class="MyNotePad.WinLauncher.MainWindow" xmlns=http://schemas.microsoft.com/winfx/2006/xaml/presentation xmlns:x=http://schemas.microsoft.com/winfx/2006/xaml Title="MainWindow" Height="350" Width="525"> <Grid> <ContentControl Name="contentControl1" /> </Grid> </Window> |
code behind:
namespace MyNotePad.WinLauncher { /// <summary> /// Interaction logic for MainWindow.xaml /// </summary> public partial class MainWindow : Window { public MainWindow() { InitializeComponent(); contentControl1.Content = new MyNotePad.MyApplication.MainWindow(); } } } |
Nous constatons que l’application a bien été embarquée par notre lanceur Windows:

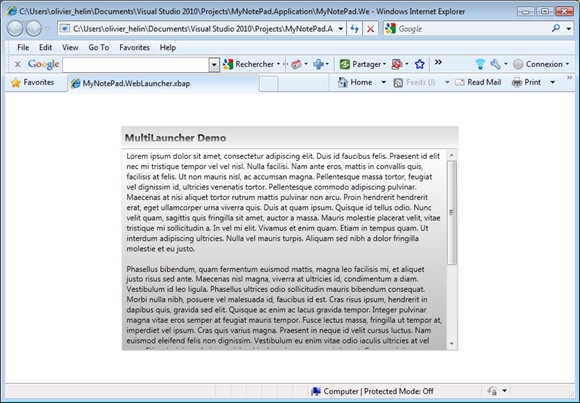
2.2.2 Lanceur Web
Créons un nouveau projet « MyNotePad.WebLauncher » de type « WPF Browser Application ». De la même manière nous ajoutons le ContentControl et son chargement en code behind
xaml:
<Page x:Class="MyNotePad.WebLauncher.Page1" xmlns=http://schemas.microsoft.com/winfx/2006/xaml/presentation xmlns:x=http://schemas.microsoft.com/winfx/2006/xaml xmlns:mc="http://schemas.openxmlformats.org/markup-compatibility/2006" xmlns:d="http://schemas.microsoft.com/expression/blend/2008" mc:Ignorable="d" d:DesignHeight="300" d:DesignWidth="300" Title="Page1"> <Grid> <ContentControl Name="contentControl1" /> </Grid> </Page> |
code behind:
namespace MyNotePad.WebLauncher
{
    /// <summary>
    /// Interaction logic for Page1.xaml
    /// </summary>
    public partial class Page1 : Page
    {
        public Page1()
        {
            InitializeComponent();
            contentControl1.Content = new MyNotePad.MyApplication.MainWindow();
        }
    }
} |
Conclusion
Il est donc possible de donner deux points d’entrées distincts à une application WPF : Window et Web. Cependant, il reste nécessaire de prendre en compte entre ces deux modes de déploiement. Le Drag N Drop ne sera pas disponible en Web à l’instar de la propriété ShowsNavigationUI accessible depuis une application WPF Web uniquement.

Comments